
Prototyping serves as a bridge between conceptual designs and market-ready products, enabling creators to explore design iterations, test functionality, and refine user experiences. As we dive into this guide, our focus will be on empowering startups and small businesses with the knowledge to navigate the complex landscape of prototyping technologies, ensuring they make informed decisions that align with their product visions and business goals.
The Stages of Prototyping: A Deeper Dive into Technologies and Methods
Early Stage: Concept and Proof of Concept Prototypes
At the inception of product development, leveraging a mix of basic and advanced tools allows for a cost-effective exploration of ideas.
Utilizing off-the-shelf components, such as sensors and microcontrollers, along with simple materials like cardboard or wood, enables swift conceptual mock-ups.
Custom PCBs or PCBAs, now easily orderable online, provide a quick path to integrating electronic functionality into these models.
For those with access, even at this nascent phase, basic 3D printing using lower-end materials and printers suffices for creating tangible versions of concepts without the necessity for high precision.
Mid-Stage: Functional and Aesthetic Prototypes
This stage marks a transition towards more refined prototypes, where functionality and aesthetics are key.
Silicone molds for rapid prototyping emerge as a significant method, allowing for the creation of detailed and tactile models that closely resemble the final product's look and feel.
Advanced 3D printing methods such as SLA and SLS, supports the development of prototypes that are essential for internal evaluations and real user testing.
The focus here is on higher fidelity models that can undergo rigorous usability and ergonomic testing.
Final Stage: Pre-production Prototypes
Entering the final stage, the goal shifts towards achieving prototypes indistinguishable from the final product. Techniques like CNC Machining, Injection Molding, and DMLS become crucial, capable of utilizing the actual materials and processes intended for the final product. This stage ensures the prototype not only meets all functional specifications but also adheres to the aesthetic and tactile qualities of the end product. Prototypes at this level are instrumental for final validations, engaging with manufacturing partners, and refining the production process before mass production begins.
Each prototyping stage is integral to the product development journey, with specific methods and materials best suited for different goals—from initial concept validation to final product refinement. The key to successful prototyping lies in selecting the appropriate technology and approach for each stage, ensuring a smooth transition from idea to market-ready product. Coming up, we will now take a closer look at the technologies involved in prototyping.
Comparative Analysis of Prototyping Technologies
Categories and Technologies/Methods List
1. 3D Printing (Additive Manufacturing)
3D printing, a cornerstone of additive manufacturing, revolutionizes how ideas are brought from digital blueprints into tangible realities. By meticulously adding materials layer upon layer, this technology encompasses a diverse array of methods, each distinguished by its unique process, material compatibility, and intended applications. This spectrum of techniques can be broadly categorized into three main types: Extrusion-Based, Resin-Based, and Powder-Based printing.
Extrusion Based:


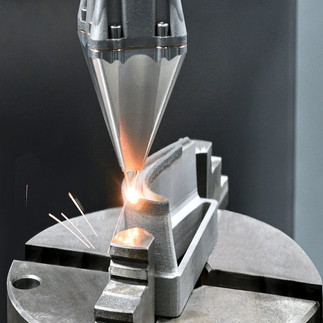


Image credit:
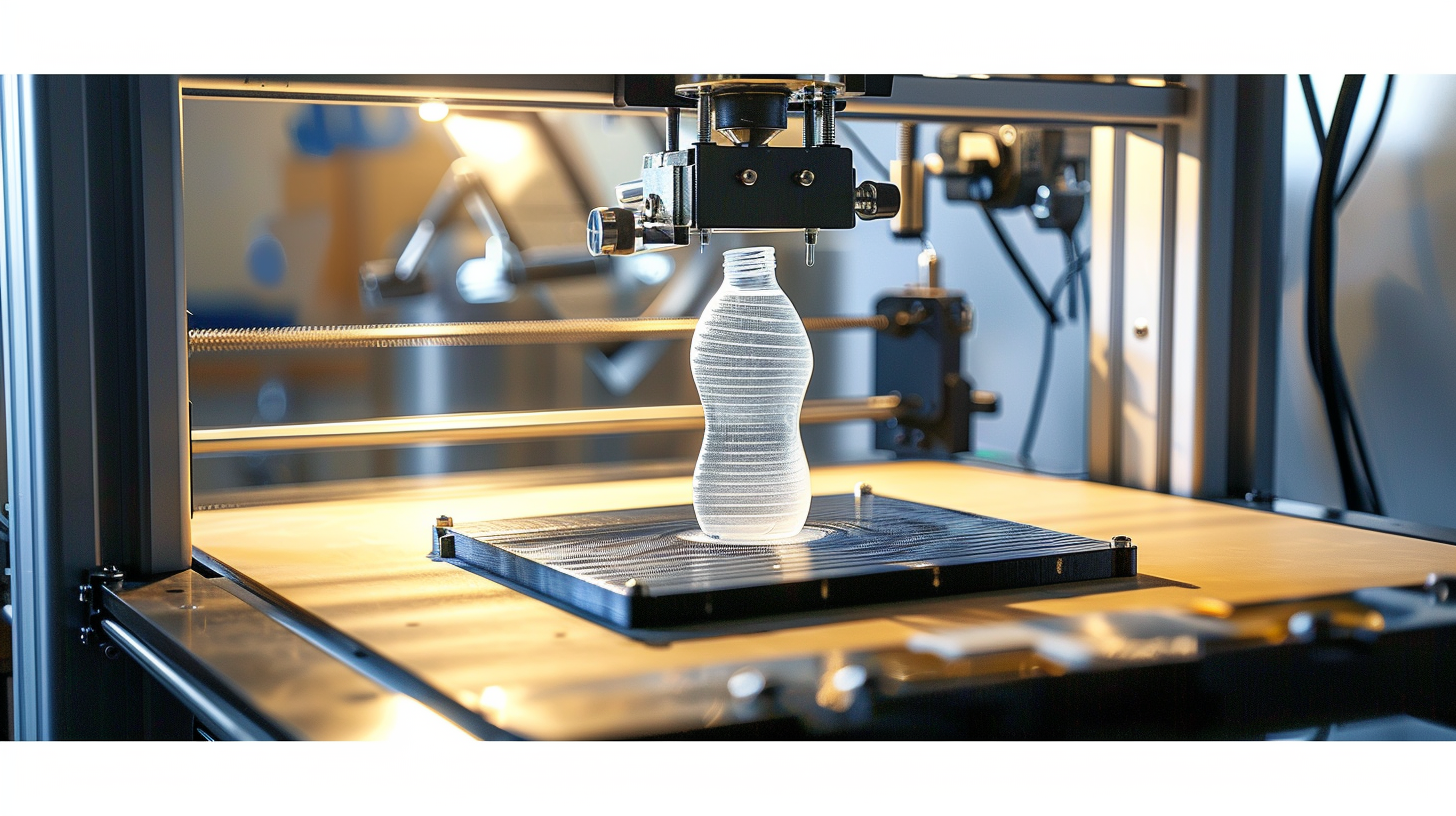
Fused Deposition Modeling (FDM)
FDM builds parts by melting and extruding thermoplastic filament through a nozzle, layer by layer.
Applications: Widely used for prototype fabrication, manufacturing aids, and even end-use parts in industries like automotive, aerospace, and consumer products.
Pros:
Material strength and durability, suitable for functional testing.
Wide range of available materials, including ABS, PLA, and specialized filaments.
Cost-effective for low-volume production.
Cons:
Visible layer lines and lower resolution.
Limited to thermoplastics.
Support removal and surface smoothing may be needed.
Fused Filament Fabrication (FFF)
Laser Metal Deposition (LMD)
Direct Energy Deposition (DED)
Bioprinting
Technology/Method | Cost | Time | Purpose | Pros | Cons |
FDM/FFF | Low to Medium | Moderate | Prototyping, educational projects, hobbyist models, functional parts | Wide range of materials, accessibility, affordability, and a large user community. | Limited resolution and accuracy, visible layer lines, and potential warping or deformation. |
LMD | High | Moderate to Long | Repairing metal parts, adding features, fabricating complex metal components | Can repair expensive components, produces complex geometries, and offers material efficiency. | High equipment and operational costs, limited to materials that respond well to laser melting, requires precise control. |
DED | High | Moderate to Long | Repairing parts, adding material to existing components, manufacturing dense metal parts | Suitable for a wide range of metals, can produce highly complex shapes, excellent for repair and adding features to existing parts. | High cost of equipment and materials, limited to conductive materials, post-processing often required for surface finish. |
Bioprinting | High | Varies | Medical research, tissue engineering, drug testing | Ability to create complex, multicellular structures, potential for revolutionary applications in medicine, customization for specific research needs. | Still experimental with significant challenges, high costs and complexity, ethical and regulatory considerations. |
Resin Based:


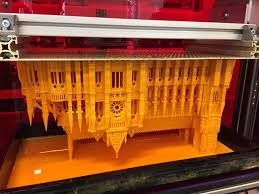


Image credit:
SLA: https://re-fream.eu/wp-content/uploads/2019/02/SLA-670x448.jpg DLP: https://3d-expo.ru/cache/cache/outsource/origin/8fa2f179a3e182a77f31c9d58e1e521c.webp
Volumetric Printing: https://i.ytimg.com/vi/rS2P0n3_DBo/hqdefault.jpg
Stereolithography (SLA)
Stereolithography (SLA) is a 3D printing technology that uses a UV laser to cure photopolymer resin, constructing objects layer by layer.
Applications: Ideal for producing models, prototypes, and parts with intricate details and smooth surface finishes, commonly used in medical devices, jewelry, and consumer goods prototypes.
Pros:
High accuracy and excellent surface finish.
Capable of producing complex geometries not possible with other techniques.
Wide variety of materials, including transparent and biocompatible resins.
Cons:
Relatively slow production speed.
Limited to small to medium-sized parts.
Post-processing requires washing and curing.
Digital Light Processing (DLP)
Liquid Crystal Display (LCD)
Monochrome LCD (Mono LCD)
Volumetric Printing
High Area Rapid Printing (HARP)
PolyJet Printing
Technology/Method | Cost | Time | Purpose | Pros | Cons |
SLA (Stereolithography) | Medium to High | Moderate | Detailed models, prototypes, dental, and jewelry | Produces parts with high detail and smooth surface finishes; ideal for applications requiring precision. | Relatively high cost compared to other resin-based methods; material limitations; requires post-processing for cleaning and curing. |
DLP (Digital Light Processing) | Medium | Moderate | Prototypes, dental models, jewelry | Cures entire layers at once, offering faster print times than SLA; capable of high detail. | Limited build volume; requires post-processing; resin can be expensive and requires careful handling. |
LCD (Liquid Crystal Display) | Low to Medium | Moderate | Affordable prototyping, educational models, hobbyist projects | Offers high-resolution prints at a lower cost than SLA and DLP; increasingly popular for consumer-grade printers. | Screen life may be limited; print speed can vary; similar post-processing requirements to other resin printers. |
MLCD (Monochrome LCD) | Medium | Moderate | High-detail models requiring faster printing | Faster curing times and longer screen life than standard LCD, improving efficiency and reducing maintenance. | Higher initial cost than standard LCD; still requires handling of toxic resins and post-processing. |
Volumetric | High | Experimental | Biomedical, complex structures | Can create objects in a single, continuous process without layers, potentially revolutionizing biomedical applications. | Still in the experimental phase with significant technical challenges; limited material options and availability. |
HARP (High Area Rapid Printing) | High | Fast | Large scale parts, industrial applications | Capable of rapid production of large parts; innovative in terms of scale and speed for resin-based printing. | Technology is still emerging and not widely available; likely high equipment costs and specific material requirements. |
PolyJet | High | Moderate | Prototypes, models with multiple materials/colors | Can print with multiple materials and colors simultaneously; excellent for detailed models and prototypes requiring a range of material properties. | High cost of machines and materials; maintenance and operation can be complex; requires cleaning and support removal. |
Powder based:


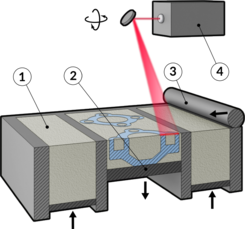


Image Credit:
Binder Jetting: https://www.3ds.com/assets/invest/2021-12/binder-jetting-s.jpeg
Metal Binder Jetting: https://amfg.ai/wp-content/uploads/2019/07/Metal-binder-jetting-Image-credit-Digital-Metal.png
Selective Laser Sintering (SLS)
SLS utilizes a laser to sinter powdered material, bonding it together to form a solid structure without the need for support structures.
Applications: Suited for functional prototypes, end-use parts, and complex designs. Used in aerospace, automotive, and consumer electronics for parts that require durability.
Pros:
Strong, durable parts with good thermal resistance.
No need for support structures, allowing for complex internal features.
Variety of materials, including nylon and flexible TPU.
Cons:
Surface finish is grainy, may require post-processing.
Color options are limited primarily to white and dyed black.
Higher cost compared to some other 3D printing technologies.
Selective Heat Sintering (SHS)
Selective Laser Melting (SLM)
Direct Metal Laser Sintering (DMLS)
Jet Fusion/ Multi Jet Fusion (MJF)
Electron Beam Melting (EBM)
Binder Jetting
Metal Binder Jetting
Technology/Method | Cost | Time | Purpose | Pros | Cons |
SLS (Selective Laser Sintering) | Medium | Moderate | Functional prototypes, small series production | Versatile material options, strong parts, no need for support structures. | Surface finish is rougher than resin-based methods; post-processing for smoother finish may be required. |
SHS (Selective Heat Sintering) | Low to Medium | Moderate | Prototyping, educational purposes | Lower equipment costs compared to laser-based systems; good for prototyping and small batches. | Limited material options and detail compared to SLS; relatively new and less proven in the market. |
SLM (Selective Laser Melting) | High | Moderate to Long | High-strength metal parts for aerospace, automotive, medical | Produces parts with very high density and strength; capable of using a variety of metals. | High cost of machines and materials; requires significant post-processing and expertise. |
DMLS (Direct Metal Laser Sintering) | High | Moderate to Long | Metal prototypes and end-use parts | Similar to SLM, capable of producing complex metal parts with high precision. | High operational costs; limited to metals and requires post-processing like support removal and surface finishing. |
MJF (Multi Jet Fusion) | Medium to High | Moderate | Functional prototypes, end-use parts in various industries | High build speed; produces parts with consistent mechanical properties; good for both prototypes and production. | Equipment and material costs can be high; limited to HP's proprietary materials. |
EBM (Electron Beam Melting) | High | Moderate to Long | Metal parts for aerospace and medical implants | Produces fully dense metal parts; process occurs in a vacuum, reducing material oxidation. | Limited to conductive materials; high equipment cost; slower compared to some metal AM methods. |
Binder Jetting | Medium | Moderate | Full-color prototypes, sand casting molds, metal parts | Wide range of materials including metals, sand, and ceramics; capable of full-color printing. | Lower mechanical properties without infiltration; metal parts require sintering to achieve full density. |
Metal Binder Jetting | Medium to High | Moderate | Small to medium volume metal parts, complex geometries | Cost-effective for metal parts compared to DMLS or SLM; no need for supports. | Post-processing includes debinding and sintering; not suitable for all metal applications. |
2. CNC Machining (Subtractive Manufacturing)
CNC Machining includes techniques like milling, turning, and drilling, removing material from a solid block to shape the part. This category is ideal for high-precision prototypes and parts made from metals or plastics, offering a smooth surface finish and high detail accuracy. CNC machining is highly versatile, suitable for a wide range of materials and complex geometries.


Image credit:
Milling
CNC milling involves the use of rotating multi-point cutting tools to remove material from the workpiece. The machine typically moves the workpiece across the cutting tool in various directions, allowing for the creation of complex shapes, slots, holes, and features.
Applications: Widely used for parts that require high precision and intricate details, including engine components, mold tooling, complex mechanisms, and enclosures.
Pros:
Versatile, capable of producing a wide range of geometries and features.
High precision and repeatability.
Suitable for a variety of materials.
Cons:
Can be relatively expensive for large volume productions due to the time-consuming nature of the subtractive process.
Requires skilled operation and programming.
Turning
Drilling
Technology/Method | Cost | Time | Purpose | Pros | Cons |
Milling | Medium to High | Moderate | Creating complex 3D shapes, prototyping, functional parts | Versatile, capable of producing complex geometries and precision parts. Can work with a wide range of materials. | Equipment and setup can be costly. Requires skilled operators. Potential for material waste. |
Turning | Low to Medium | Fast to Moderate | Producing cylindrical parts, prototypes, functional components | Highly efficient for parts with cylindrical features. Good surface finish and precision. Cost-effective for round parts. | Primarily limited to rotational parts, less versatile than milling for complex geometries. |
Drilling | Low | Fast | Creating holes of various diameters in parts, component assembly preparation | Simple and efficient for creating holes. Can be performed on a variety of materials. Relatively low cost. | Limited to creating holes; additional processes are often needed for part completion. Does not produce complex shapes. |
3. Injection Molding
This process involves injecting molten material into a mold to form parts. Traditional injection molding is used for high-volume production, while rapid injection molding allows for faster turnaround times for prototyping or small batches. Overmolding and insert molding are specialized techniques that combine materials or components for enhanced functionality or aesthetic qualities.


Image credit:
Traditional Injection Molding: https://prototechasia.com/wp-content/uploads/plastic-injection-molding.jpeg
Rapid Injection Molding: https://autoprotoway.com/wp-content/uploads/2020/12/rapid-injection-molding-3.jpg
Overmolding: https://www.iqsdirectory.com/articles/plastic-injection-molding/plastic-overmolding/what-is-overmolding.jpg
Traditional Injection Molding
Traditional injection molding is optimized for high-volume production, utilizing steel molds that can withstand millions of cycles. It's the go-to method for manufacturing parts at scale due to its efficiency and the ability to maintain consistent quality across large runs.
Applications: Extensively used across various industries including automotive, medical, consumer electronics, and packaging for products like plastic containers, medical devices, and automotive dashboards.
Pros:
Economies of scale for large production runs.
High precision and consistency across parts.
Wide range of material choices and finish options.
Cons:
High initial tooling cost, making it less viable for low-volume productions.
Longer lead times due to mold design and manufacture.
Design restrictions tied to mold-making capabilities and material flow.
Rapid Injection Molding
Overmolding
Insert Molding
Technology/Method | Cost | Time | Purpose | Pros | Cons |
Traditional Injection Molding | High | Long (for setup) | Mass production of plastic parts | Offers economies of scale for large runs, excellent repeatability, and a wide range of material choices. Capable of producing complex parts with tight tolerances. | High initial costs for tooling and setup make it less suitable for small runs. Design changes can be costly once the mold is made. |
Rapid Injection Molding | Medium | Short | Prototyping, small production runs | Reduces the time and cost associated with traditional injection molding, making it ideal for prototyping and short runs. Allows for faster design iterations. | Higher per-part cost compared to traditional injection molding at scale. Material choices may be more limited. |
Overmolding | Medium to High | Moderate | Adding soft touch surfaces to parts, multi-material components | Allows for the creation of parts with multiple materials, improving grip or aesthetic appeal. Can enhance product functionality and durability. | Requires specialized tooling and a more complex manufacturing process, increasing costs. Not all materials are compatible for overmolding. |
Insert Molding | Medium to High | Moderate | Incorporating metal or other components into plastic parts | Integrates multiple components into a single part, reducing assembly time and increasing part strength and functionality. | Complex process that can increase the cost and time of manufacturing. Design constraints must be carefully considered to ensure part integrity. |
4. Vacuum Casting
Vacuum casting uses silicone molds to create replicas from a master model, typically produced using 3D printing. It's a cost-effective method for producing small numbers of high-fidelity prototypes or parts, allowing for a variety of materials that mimic the properties and appearance of production-grade materials.


Image credit:
Silicone Molding: https://www.smooth-on.com/pw/site/assets/files/24806/card-mm252part.jpg
Urethane Casting: https://formlabs-media.formlabs.com/filer_public/6a/79/6a795136-7b78-4fa3-a409-fcbd52227feb/urethane_hero.jpg
Silicone Molding
Silicone molding in vacuum casting involves creating a silicone rubber mold around a master model. The master model is first encapsulated in silicone, then, once cured, is cut open and removed, leaving a cavity that perfectly replicates the master's geometry.
Applications: Ideal for producing parts that require high detail fidelity and a smooth surface finish, such as consumer electronics, medical models, and automotive components. Silicone molds are capable of reproducing textures, fine details, and undercuts.
Pros:
Excellent detail reproduction and surface quality.
Flexibility in material choice, allowing for parts to be cast in a range of polyurethanes that can simulate properties of plastics, rubbers, and metals.
Silicone molds can produce 20-25 copies before degradation, making it suitable for low-volume production.
Cons:
The life span of silicone molds is limited, with the quality of replicas potentially decreasing after multiple uses.
Initial costs for the master model creation and mold can be high, especially for complex parts.
Longer lead times compared to direct 3D printing due to the additional steps of mold creation and casting.
Urethane Casting
Technology/Method | Cost | Time | Purpose | Pros | Cons |
Silicone Molding | Low to Medium | Fast | Prototyping, small batch flexible parts | Cost-effective for small batches with high detail fidelity, ideal for prototypes needing flexibility or transparency. Offers diverse material and color options. | Molds degrade after 20-25 casts, limiting long-term cost-efficiency and larger production runs. Parts' physical properties may not match those produced by other methods. |
Urethane Casting | Medium | Moderate | Short-run production, high-quality prototypes | Produces parts with excellent detail and surface finish, simulating a wide range of materials. Versatile in creating parts from flexible to rigid, suitable for functional prototypes. | More expensive than silicone due to materials and process. Mold wear affects medium-volume production cost-effectiveness, and part properties vary with formulation. |
5. Other Prototyping Methods
Laminated Object Manufacturing (LOM) builds up prototypes using layers of paper, plastic, or metal laminates, suitable for larger models. Sheet Metal Fabrication is crucial for prototypes requiring metal sheets, used in electronics, automotive, and aerospace applications. Rapid Tooling bridges prototyping and production, creating molds faster and more affordably than traditional tooling methods, particularly useful for injection molding and vacuum casting processes.


Image credit:
Sheet Metal Fabrication: https://www.madearia.com/wp-content/uploads/2022/05/08.png
Laminated Object Manufacturing (LOM)
Laminated Object Manufacturing is a rapid prototyping process that builds three-dimensional objects by stacking layers of paper, plastic, or metal laminates. Each layer is cut to shape with a laser or knife before being bonded to the layer below, gradually forming the desired prototype.
Applications: LOM is particularly suited for creating larger models quickly and at a lower cost. It's used in industries such as architecture for creating scale models, in product design for large prototypes, and in the aerospace industry for lightweight structural components.
Pros:
Cost-effective for large models due to the use of inexpensive materials like paper.
Capable of producing relatively large parts quickly.
Minimal waste generated as excess material can often be recycled.
Cons:
Limited material choice, primarily to those that can be laminated.
Finished objects may require additional treatment for strength and durability.
The accuracy and surface finish might not match those achieved with other prototyping methods.
Sheet Metal Fabrication
Rapid Tooling
Actionable Suggestions
When deciding on a prototyping method, it's essential to consider the stage of your product development and the unique needs of your project. Here are some actionable steps to guide your decision:
Assess Project Requirements: Clearly define what you need to test with your prototype—be it form, function, user interaction, or material properties. This clarity will help you select the most appropriate prototyping technology.
Consider Cost and Time: Evaluate your budget and timeline constraints. Some prototyping methods, like 3D printing, offer quick and cost-effective solutions for early stages, while others, such as CNC machining or injection molding, might be more suited for later stages requiring higher fidelity.
Flexibility is Key: Be prepared to shift between prototyping methods as your product evolves. Early stages might benefit from rapid, less expensive techniques, while further development stages might require more sophisticated, detailed, and hence potentially more costly methods.
Prototype Iteratively: View prototyping as an iterative process. Initial prototypes help validate concepts and design directions, while subsequent iterations refine functionality, aesthetics, and user experience.
Gather Feedback: Use prototypes to gather user feedback early and often. Real-world interactions with your prototype can provide invaluable insights that guide further development.
Partner with Experts: If uncertain, consult with prototyping experts who can offer guidance tailored to your project's specific needs and help navigate the vast array of available technologies.
Conclusion
Selecting the right prototyping technologies is crucial in turning your innovative ideas into tangible, market-ready products. By carefully considering each technology's advantages and limitations in the context of your project's specific needs, you can efficiently navigate the prototyping process. Remember, prototyping is inherently iterative—each step, from concept validation to final design refinement, builds upon the last, leveraging feedback and insights to improve the product. Embrace flexibility, anticipate the need to pivot between different methods, and utilize each prototype as a learning opportunity to refine your vision.
Are you embarking on a product development journey and feeling overwhelmed by the choices in prototyping technologies? EZProdDev is here to help. Leveraging our rich industry network, which encompasses a broad spectrum of prototyping technologies, EZProdDev is poised to offer tailored guidance and support, ensuring that your prototyping journey is not only effective but also mirrors the best practices and innovations of the field. This wealth of resources allows us to match your specific project needs with the most suitable prototyping methods, streamlining your path from concept to reality.
Appendix
3D Printing (Additive Manufacturing): A process that creates physical objects from digital designs by layering materials. It includes various techniques like SLA, SLS, and FDM, each with distinct material compatibilities and finishing qualities.
CNC Machining (Subtractive Manufacturing): A precision manufacturing process where computer software dictates the movement of factory tools and machinery. It includes operations like milling, turning, and drilling, suitable for creating high-precision parts from a solid block of material.
Injection Molding: A manufacturing process for producing parts in large volume. It involves injecting molten material into a mold. Ideal for mass production of plastic parts with high complexity.
Vacuum Casting: A casting process for elastomers using a vacuum to draw the liquid material into the mold. It's used for producing small numbers of high-quality prototypes or parts from a silicone mold.
Stereolithography (SLA): An additive manufacturing process that uses a UV laser to cure liquid resin into hardened plastic in a process called photopolymerization, suitable for detailed prototypes with smooth surface finishes.
Selective Laser Sintering (SLS): A 3D printing technology that uses a laser to sinter powdered material, binding it together to create a solid structure. It's known for its ability to produce durable parts with complex geometries.
Fused Deposition Modeling (FDM): A 3D printing process that extrudes thermoplastic filaments through a heated nozzle, layer by layer, to build an object. It's widely used for its versatility in materials and ease of use.
Digital Light Processing (DLP): Similar to SLA, this method uses a digital projector screen to flash a single image of each layer across the entire platform. Known for speed and precision, it's used for detailed prototypes.
Multi Jet Fusion (MJF): An HP-developed additive manufacturing method that prints parts with fine details and superior mechanical properties. It applies a fusing agent to a powder bed, which is then fused by heating elements.
Direct Metal Laser Sintering (DMLS): A metal 3D printing technology that uses a laser to sinter powdered metal, creating prototypes or parts that are typically used in aerospace, automotive, and medical industries.
Binder Jetting: A 3D printing process where a binding agent is selectively deposited to join powder particles. It can be used to create full-color prototypes as well as metal and sand casting molds.
PolyJet Printing: A 3D printing technique offering the ability to print with multiple materials simultaneously. Known for its high resolution and precision, it's suitable for prototypes that require fine details and a smooth finish.